How to get the most out of the TruBlu Evacuation rig, quickly and safely achieve deep, dry and tight systems.
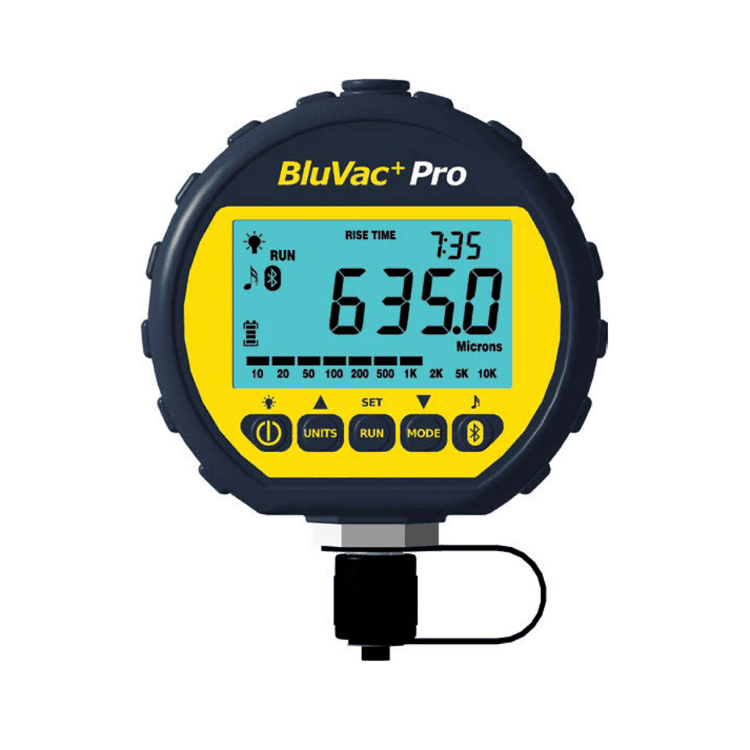
BluVac+ Pro Wireless Digital Vacuum Gauge NZ
TruBlu hoses are dedicated evacuation hoses and should never be used as refrigerant transport hoses or for positive pressure application. Oils used in refrigeration applications also have an affinity for moisture. Moreover, oil coating the hose lining significantly impacts the evacuation speed due to desorption of moisture which occurs in vacuum.
TruBlu hoses work with most any vacuum gauge, however we strongly recommend the Accutools BluVac+ models to take advantage of the free BluVac App. The BluVac App offers guidance, education, reporting, and diagnostics to assist and document the evacuation process.
The BluVac Application supports BluVac+ Pro, BluVac+ LTE, and the BluVac+ Micro.
How Does TruBlu Work?
If you want the short answer, pretty darn good and freaky fast! If you want to know the science, and the math read below. If you hate math and just want to believe us, skip to the Getting Started section following this section.
The Science and the Math
The first principle to remember is that evacuation accomplishes two key things; degassing, and dehydration. Degassing is the removal of air and other gasses. Dehydration is the removal of water and water vaper. Degassing happens fairly quickly, while dehydration requires a much deeper vacuum and more time. TruBlu hoses accomplish both in a fraction of the time of typical hoses. What’s the secret sauce? Trublu hoses actually achieve lower evacuation targets than our competitors’ hoses. The deeper the evacuation, the faster the job.
To have flow in a line, there has to be a pressure difference. When evacuating atmosphere from a system, the pressures become so small that the flow becomes minute. If the pressure at your vacuum pump inlet for example is 500 microns (.009 psi), and in your system outlet 700 microns (.013 psi) the pressure difference across the hose is .004 psi or 4/1000th of a psi. With pressures so small, the friction created by small lines can have a huge impact on flow.
The friction created by the connecting lines is measured by “Conductance Speed”. Conductance is simply the maximum attainable flow through a hose at a stated average pressure. Where in a pressure system we refer to pressure losses as “Pipe Friction Loss” in vacuum we refer to these losses as Pressure Drop. Specifically, we are referring to the pressure drop created by the friction in the connecting hoses. As can be seen by the quote below, Conductance Speed in evacuation is nothing new. As an industry, it is something we simply seem to forget.
The conductance speed of 1/4″ OD refrigeration tubing is too small to be useful as a connecting line in a system; so small we will not even discuss it. Never use it if you can avoid it as it is too costly in excessive pump-down time. Review of Vacuum for Service Engineers, Saunders and Williams Copyright 1959, Revised 1988, p. 60.
Mathematically it is important to understand that increasing the diameter of a hose does not have a linear effect but rather that to a ratio of its diameter to the third or fourth power. By diameter, we’re talking ID not OD.
Comparing 1/4″ ID hose to TruBlu 3/4″ ID hose shows a Conductance Speed increase of approximately 96 times faster! (.254 = .00331) vs. (.754 = .31972) or (.31972/.00331 = 96.5)
In addition to higher conductance, we need to consider the type of flow. In vacuum there are three types of flow to consider: viscous, laminar, and molecular. Viscous flow means we have a steady stream of molecules flowing through the pipe. As we get to laminar and molecular flow things really slow down, so staying in the viscous flow region is critical for quick evacuation times (and hence, our focus!).
Viscous flow ends where the microns are approximately 100/d” or 100/internal diameter of the tubing in inches. When comparing viscous flow in various diameters, again you can see that 3/4″ tubing has a huge advantage. Viscous flow stops in 1/4″ tubing at 400 microns (100/.25″ = 400 Microns) where 3/4″ viscous flow continues to 133 microns (100/.75″ = 133 microns). This is important because with a larger diameter we get a 3X deeper vacuum in the viscous flow region (400/133= 3.00). A deeper vacuum means faster degassing and much better dehydration. Dehydration is critical more than ever for systems contaminated with POE oils since moisture breaks-down the oil forming sludge and acids.
So how much faster is a 5 foot, 3/4″ ID hose than 1/4″ ID at 500 microns? Approximately 80 times faster.
The conductance for air at 68°F is expressed as 520 x d4 x P/L where P is the pressure in mm Hg Absolute and length is expressed in feet of hose.
Where 500 microns (520 x .25″4 x .500)/5′ (520 x .75″4 x .500)/5′ 16 CFM/.2 CFM
= .5 mm Hg abs
= .2 CFM
= 16 CFM
= 80 CFM faster at 500 microns of Hg
Getting Started with TruBlu
Cautions/Safety
TruBlu hoses are intended for use by professionally trained HVAC technicians. TruBlu hoses are not intended for pressure. They are designed for vacuum only the same as your vacuum pump. Pressurizing a vacuum hose could cause displacement of the O-ring seal which leads to pressure loss, refrigerant loss, and could cause bodily injury.
Always wear gloves and goggles and other required PPE when working on or around refrigerants.
Product Use
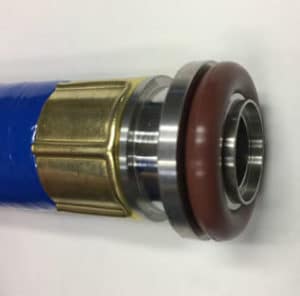
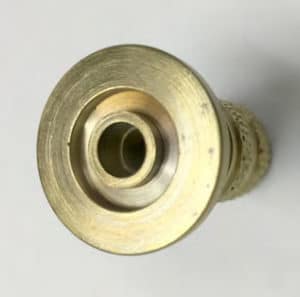
TruBlu hoses use KF or Quick Flange fittings. KF fittings allow for one hose to be used in multiple applications with a variety of end configurations. The hose can also be connected to a tee ‘T’ or wye ‘Y’ fitting to further expand the system flexibility. KF fittings use a taper lock flange and clamp connection that is sealed with an O-ring. Unlike typical KF fittings used in industrial vacuum service, TruBlu hoses have the centering ring built into the flange to prevent the centering O-ring from falling on the ground when end changing fittings in the field (patent pending).
Once an end fitting is installed on a hose there is no need to remove it unless you want to change the hose configuration. Leaving the fittings on the hoses prevents damage to the O-rings and protects the flanges from damage. A plastic cap is included with each end connection, and it is advised that end connections that are not in use the flange is capped. This will prevent the sealing surface from getting scratched, nicked, or marred. The flat surface is the sealing surface, and care should be taken that it is not damaged.
There are two types of clamps provided in your kit, a stainless low-profile type (p. 6 left) and a larger aluminum clamp (p.6 right). These are standard KF style clamps. Clamp wing nuts only need to be finger tight. The connection is actually self-sealing under vacuum. The low-profile clamp is intended to be used on the hose end that connects to the Schrader core removal tool and intern the equipment, the larger clamps are intended to be used where space is not limited.
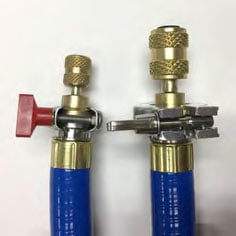
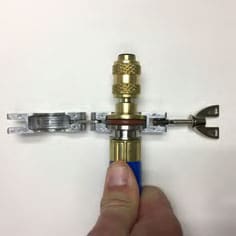
When connecting the TruBlu hoses to the equipment, ensure that you relieve all the pressure on the system. Removing the Schrader cores provide the fastest evacuation. The 1/4” hose-end is to be connected directly to the back of the AccuTools Schrader Core Removal Tool. *If the cores cannot be removed, connect the AccuTools Schrader Core Depressor to the service valve, and depress the core with the thumb screw to fully open the Schrader port. Removing the cores significantly decreases the evacuation time, and the core tool can be used to reinsert the core even after the system refrigerant charge as been released and the system is under pressure.
Vacuum and Pressure Rated Valve Core Removal Tool
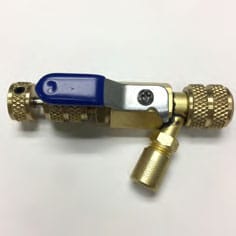
Vacuum and Pressure Rated Schrader Core Depressor
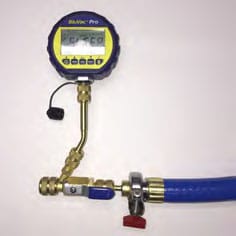
Core Tool with Vacuum Gauge Installed on Side Port

Core Tool with Vacuum Gauge Installed on Side Port and Schrader Core Depressor/Angle Valve
Steps to Assure a Fast Evacuation
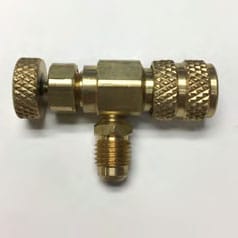
An accessory tee fitting is included in the Pro and Standard Kits to permit an additional hose to be connected. This is sometimes helpful to get from the vacuum pump to the service ports. Reducing the two ports to a single port will not significantly affect the evacuation times as each hose is rated at 16 CFM conductance speed at 1,000 microns.
- Alwayspurgethesystemwithdrynitrogenwhileassemblingthetubing.
- Sweepthesystemwithdrynitrogenbypurgingfromthesuctiontotheliquidsideofthesystemtocarry out any moisture or particulates.
- Afteranitrogensweep,pressurizethesystemwithnitrogenandallowittostandatthemanufacture’s recommend test pressure for at least the minimum recommend time to assure a leak free system.
- VentthenitrogenandremovetheSchradercoresformthesystem.
- Wheneverpractical,itisalwaysadvisabletoevacuatefrombothsidesofthesystemusingtwoofthe 1-meter lengths of hose connected directly to the system and the vacuum pump. Pulling from both sides assures a fast evacuation as you are not pulling through the metering device which can have rather small porting. Pulling from both sides also aids in faster and better dehydration as a deeper vacuum is often achievable.
- Startthevacuumpumpwiththegasballastopenandshuttheballastat10,000to12,000microns.The system may drop very quickly, so pay close attention to the vacuum readings. A vacuum pump cannot typically achieve full vacuum with the ballast open.
- Closethegasballastandevacuatetothetargetpressure.Thetargetpressureistypically200to300 microns below the maximum allowable decay pressure. For adequate system dehydration, leave the vacuum pump running below the target for 1 to 60 minutes.
- IsolatethesystemfromthevacuumpumpbySLOWLYclosingthecoretoolstoremoveanygastrapped in the ball valve and watch the rate of system rise. This is called a decay or leak test. The below graphs are available free from the AccuTools BluVac Application.
- A slight rise followed by slowing of the leak rate assures that the system is dry and tight. If the vacuum rise rate does not slow it indicates a potential leak in the system. If the systems rises and levels off near 2,000 to 3,000 microns the system is likely tight but still wet and needs further evacuation time.
- With core tools closed, release the refrigerant charge into the system and reinstall the valve cores after attaching the valve core to the stem, attaching it loosely to the back of the core tool and venting the air from the core compartment to prevent any air from being introduced into the system.
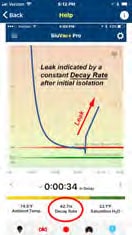
Rapid rise indicates a leak that needs to be repaired and pressure tested before continuing evacuation.
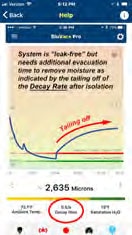
Rise with curving tail indicates tight but wet system that needs further evacuation.
Checking Your TruBlu Hose Rig for Leaks
Let’s start with the statement, “everything leaks!” What concerns us is the leak rate. The pump and vacuum rig have to overcome the leaks in the hoses or connections, so a low leak rate is critical for good evacuations. TruBlu hoses have a very low leak rate and low water adhesion properties. This means that TruBlu hoses effectively move all the work that your vacuum pump is doing at the pump inlet to the end of your hose where it should be.
To check your rig for significant leaks it is first prudent to check the vacuum pump. Vacuum pumps used for HVAC work should be capable of pulling at least 50 microns, ideally below 20 microns of mercury. To test the ultimate pull of your pump, start with fresh clean high-quality vacuum pump oil, cap the hose ports and attach a micron gauge directly to the 1/4″ port on the pump with a brass coupling.
Test the Pump
Start the pump, close the gas ballast, and allow the pump to run for at least 10 minutes. The vacuum may slightly decrease over time as the pump oil warms and the vapor pressure of the oil decreases – this is normal. Record the vacuum level after 10 minutes. We recommend that you jot the level down on a piece of tape and attach it to the pump for future reference. If your pump will not pull below 50 microns, you may need to service the pump or replace it.
Attach the TruBlu Vacuum Rig
Now test the vacuum rig. Attach your vacuum rig or a vacuum and core tools to a (user supplied) brass tee fitting and in turn to your micron gauge at the end of the rig forming a continuous loop.
Degas and Dehydrate
Start the pump and allow it to run for at least 10 minutes to degas and dehydrate the hoses. Brand new hoses may require more time to degas, perhaps as much as 10 minutes the first time use.
Performance Test
After 10 minutes, isolate the pump by closing the blocking valve or shutting off the vacuum pump. Break the vacuum by loosening a connection on the rig. The hoses should be dry. Retighten the connection and immediately restart the vacuum pump and evacuation. Let the pump run an additional 5 minutes and confirm that you can pull below 100 microns at the far end of the rig. This is a dynamic test meaning the we are testing the pump, vacuum rig, to assure that we can achieve the desired vacuum at the system inlet.
Note: After 5 minutes your vacuum rig should be able to achieve 100 microns or less. TruBlu will typically achieve near the following results.
Performance Expectations
Pump ultimate pulldown = 50 microns ——- TruBlu Rig 100 microns or lower Pump ultimate pulldown = 25 microns ——- TruBlu Rig 50 microns or lower Pumpultimatepulldown=10microns ——-TruBluRig30micronsorlowerTruBlu Evacuation Tools Steps to a Proper Evacuation