To service an Imperial® Diaphragm Manifold you will need the following tools:


- Imperial Overhaul Hit 600R
- Adjustable Wrench
- Clean Crease (Optional)
- Torque Wrench
- Long Nose Pliers
- Clean Rags
- Methylated Spirits or Rubbing Alcohol
Safety is important

- Ensure work area is clean and well lit
- Ensure there are no hazards or obstructions
- Ensure you have safety glasses and put them on NOW
- Check the manifold is not damaged
- Check gauges are tight
- Ensure the sightless (if fitted) has no damage.
Step 1 – Remove the handles

- Using long-nose pliers gently prise off the knobs and place them in a safe convenient location
- Check for any damage and replace if cracked
Step 2 – Remove Piston Assemblies

- Remove all large brass nuts from the manifold
- Gently pierce the large white diaphragm and remove it
- Remove the spring and piston which is now removed
Step 3 – Remove All Components from Manifold
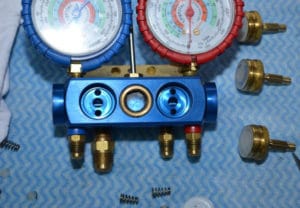
- Your manifold should now be looking like this.
- Check inside the cutout for the diaphragm seals, ensure there are not scratches or damage inside where the valve seats
Step 4 – Clean Valve Seat

- Using a lint-free rag soaked in methylated spirits (or rubbing alcohol) clean the valve seat assembly
- Leave to dry and ensure all alcohol has evaporated
Step 5 – Clean Brass Components

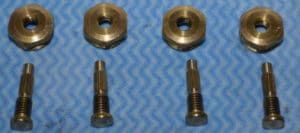
- Next, disassemble the piston assembly and seal
- Using a lint-free cloth soaked in a little alcohol clean all the brass components
- Do this for all remaining piston assemblies
- Using light crease lubricate the thread of the piston. Do this for all remaining pistons
- You should end up with all pistons cleaned, brass nuts clean and all parts ready for assembly
Step 6 – Open the Repair Kit

- Open the 600R kit and remove the components
- Divide into 2, each kit does 2 valves
- You should have
– 2 Diaphragms (1 Thick 1 Thin)
– A Brass Spacer
– A Spring
– A Small Nylon Spring Cap
Step 7 – Start Re-Assembly

- Place the Spring (Large End Down) into the receptacle in the valve seat
- Place spring cap on top
Step 8 – Valve Assembly

- (Optional) Place a small amount of grease onto the edge of 1 face of the thick seal. Place Grease side down into the housing.
Step 9 – Valve Re-assembly

- Place the thin seal into the receptacle
- Place the spacer on top of this


- Next, lightly grease screw thread of piston and insert into large brass nut

- Ensure piston is fully restricted into the brass nut
- Place assembly into valve seat and gently hand tighten the large nut

- Tighten brass nut to 125 inch-pounds with a torque wrench
- Repeat seal and piston installation and torque all remaining valve port assemblies
- Check torque again after 24 hours
Last Step – Complete Re-Assembly

- Finally, replace all knobs back onto piston shafts
- Gently tighten fully and then loosen pistons
- Perform cleanup of any excess grease